Building an ETL pipeline with Apache Airflow and Visualizing AWS Redshift data using Microsoft Power BI
Check the article here: Building an ETL data pipeline with Apache Airflow and Visualizing AWS Redshift data using Microsoft Power BI
Have you heard phrases like Hungry? You're in the right place or Request a trip, hop in, and relax. ? Both phrases are very common in our daily lives, they represent the emblems of the two most important businesses with millionaire revenues from UBER. Have you ever thought about how much money you spend on these services? The goal of this project is to track the expenses of Uber Rides and Uber Eats through a data Engineering processes using technologies such as Apache Airflow, AWS Redshift and Power BI. Keep reading this article, I will show you a quick and easy way to automate everything step by step.
Architecture - Uber expenses tracking

What are the data sources?
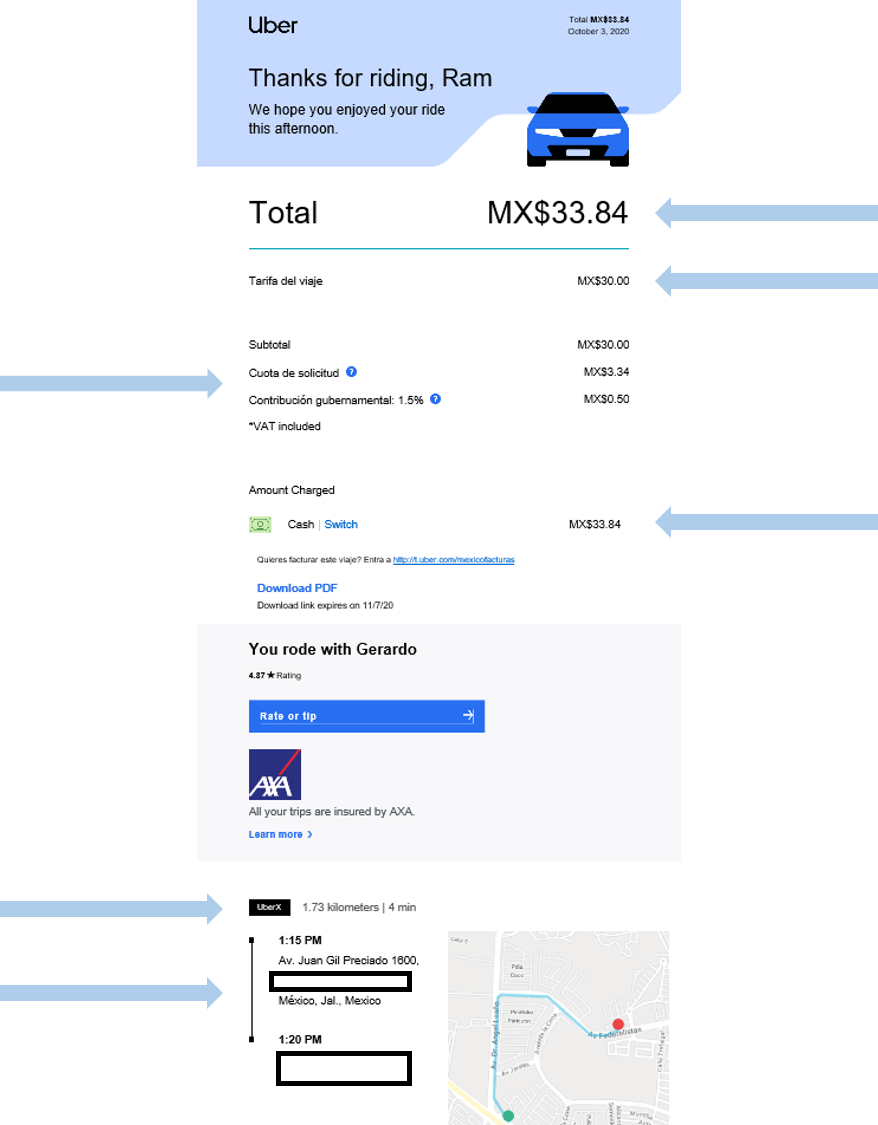
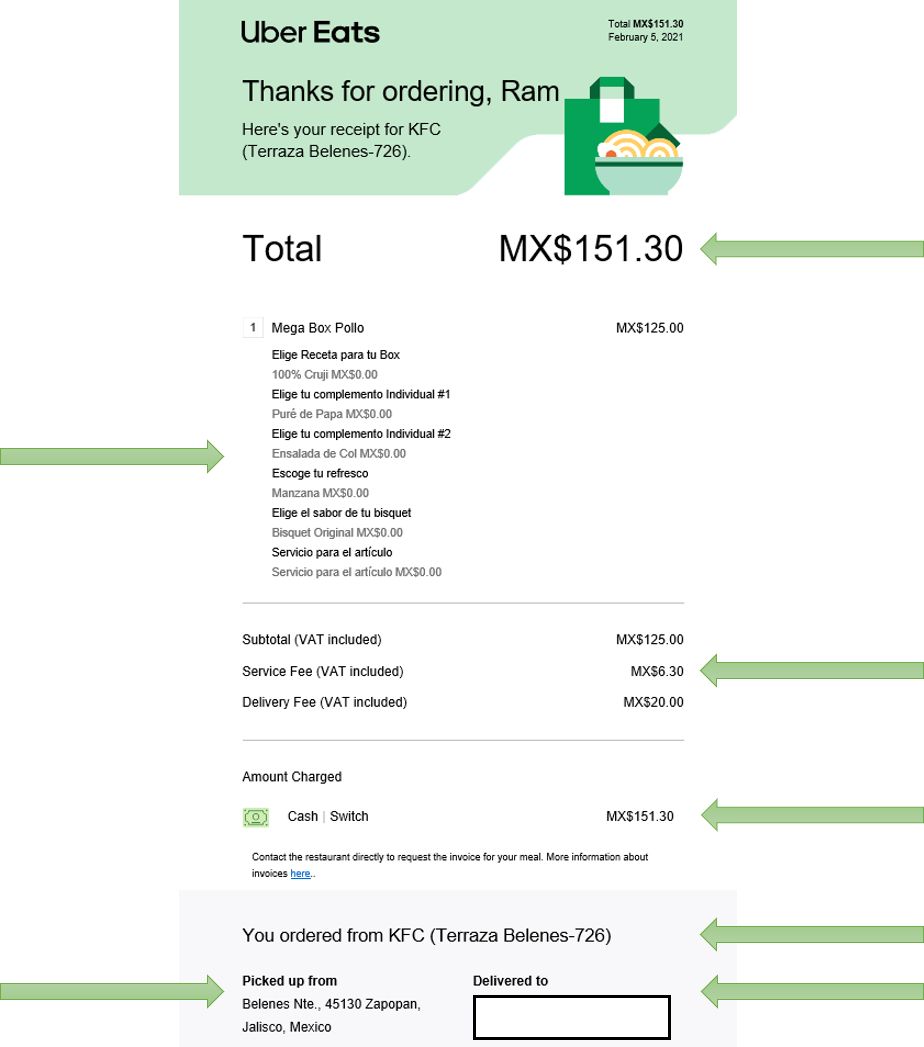
Every time an Ubers Eat or Uber Rides service has ended, you will receive a payment receipt to your email, this receipt contains the information about the details of the service, and is attached to the email with the extension .eml. Take a look at the image below, both receipts belong to the details sent by Uber about Eats and Rides services, this will be our original data sources, In my case, I downloaded all those receipts from my email to my local computer.
Uber Rides receipt example
Uber Eats receipt example
Data modelling
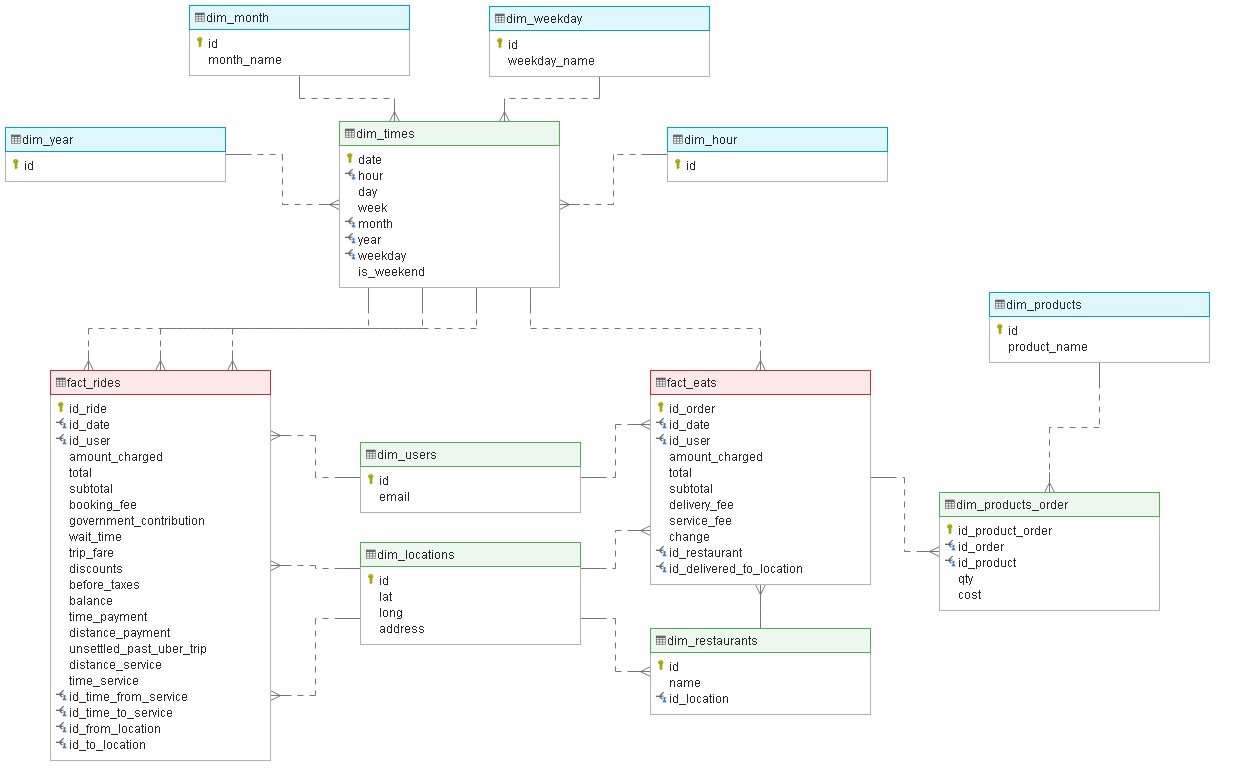
Once the details for each type of receipt have been detected, it is easy to know what are the features, entities, and relations of the model. My proposed data model contains the expenses of both services separated in different fact tables, sharing dimensions between these facts, therefore, the proposed model will be a constellation scheme.
Infrastructure as Code (IaC) in AWS
The aim of this section is to create a Redshift cluster on AWS and keep it available for use by the airflow DAG. In addition to preparing the infrastructure, the file AWS-IAC-IAM-EC2-S3-Redshift.ipynb will help you to have an alternative staging zone in S3 as well. Below we list the different steps and the things carried out in this file:
- Install git-bash for windows, once installed , open git bash and download this repository, this will download the dags folder and the docker-compose.yaml file, and other files needed.
ramse@DESKTOP-K6K6E5A MINGW64 /c
$ git clone https://github.com/Wittline/uber-expenses-tracking.git
- Second, create a new User in AWS with *AdministratorAccess** and get your security credentials
- Go to this url: AWS CLI and configure your AWS Credentials in your local machine
- Setup local environment with Google Colab:
- Go to CMD and put:
C:\>jupyter notebook --NotebookApp.allow_origin='https://colab.research.google.com' --port=8888 --NotebookApp.port_retries=0 - After the execution of the last command, copy the localhost url, you will need it for colab
- Go to Google Colab
- Create a new Notebook
- Go to -> Connect -> “Connect to local runtime” -> Paste the url copied from the last step and put it in Backend URL -> connect
- Upload the file AWS-IAC-IAM-EC2-S3-Redshift.ipynb, and use it into your colab local env:
- Create the required S3 buckets
- uber-tracking-expenses-bucket-s3
- airflow-runs-receipts
- Move Uber receipts from your local computer to S3
- Loading params from the dwh.cfg file
- Creating clients for IAM, EC2 and Redshift cluster
- Creating the IAM Role that makes Redshift able to access to S3 buckets ReadOnly
- Creating Redshift cluster
- Check cluster details until status show Available
- Showing Redshift cluster endpoint and role ARN
- Incoming TCP port to access to the cluster ednpoint
- Checking the connection to the Redshift cluster
- Cleaning and deleting the resources
- Create the required S3 buckets
- Go to CMD and put:
Content of AWS-IAC-IAM-EC2-S3-Redshift.ipynb
Libraries
import pandas as pd
import glob
import os
import boto3
import json
import configparser
from botocore.exceptions import ClientError
import psycopg2
Cloning repository, Buckets creation, folders and uploading the local files to S3
def bucket_s3_exists(b):
    s3 = boto3.resource('s3')
    return s3.Bucket(b) in s3.buckets.all()

def create_s3_bucket(b, folders):
    client = boto3.client('s3')
    client.create_bucket(Bucket=b, CreateBucketConfiguration={'LocationConstraint': 'us-east-2'})
    if folders is not '':
        fls = folders.split(',')
        for f in fls:
            client.put_object(Bucket= b, Body='', Key=f + '/')

def upload_files_to_s3(file_name, b, folder, object_name, args=None):

    client = boto3.client('s3')

    if object_name is None:
        object_name = folder + "/{fname}".format(fname= os.path.basename(file_name))

    response = client.upload_file(file_name, b, object_name , ExtraArgs = args)

    return response


ACLargs = {'ACL':'authenticated-read' }
bucket_names = {'uber-tracking-expenses-bucket-s3': 'unprocessed_receipts', 'airflow-runs-receipts':'eats,rides'}

print('Creating the S3 buckets...')
for k in bucket_names:
    if not bucket_s3_exists(k):
       create_s3_bucket(k, bucket_names[k])

print('S3 buckets created')

print('Uploading the local receipts files to uber-tracking-expenses-bucket-s3 AWS S3 bucket...')
files = glob.glob("localpath/receipts/*")

for file in files:
    print("Uploading file:", file)
    print(upload_files_to_s3(file, 'uber-tracking-expenses-bucket-s3', 'unprocessed_receipts', None, ACLargs))


print('Files uploaded to uber-tracking-expenses-bucket-s3 AWS S3 bucket')
Loading all the Params from the dwh.cfg file
 config = configparser.ConfigParser()
config.read_file(open('/Uber-expenses-tracking/IAC/dwh.cfg'))

KEY                    = config.get('AWS','KEY')
SECRET                 = config.get('AWS','SECRET')

DWH_CLUSTER_TYPE       = config.get("DWH","DWH_CLUSTER_TYPE")
DWH_NUM_NODES          = config.get("DWH","DWH_NUM_NODES")
DWH_NODE_TYPE          = config.get("DWH","DWH_NODE_TYPE")

DWH_CLUSTER_IDENTIFIER = config.get("DWH","DWH_CLUSTER_IDENTIFIER")
DWH_DB                 = config.get("DWH","DWH_DB")
DWH_DB_USER            = config.get("DWH","DWH_DB_USER")
DWH_DB_PASSWORD        = config.get("DWH","DWH_DB_PASSWORD")
DWH_PORT               = config.get("DWH","DWH_PORT")

DWH_IAM_ROLE_NAME      = config.get("DWH", "DWH_IAM_ROLE_NAME")

(DWH_DB_USER, DWH_DB_PASSWORD, DWH_DB)

pd.DataFrame({"Param":
                  ["DWH_CLUSTER_TYPE", "DWH_NUM_NODES", "DWH_NODE_TYPE", "DWH_CLUSTER_IDENTIFIER",
                   "DWH_DB", "DWH_DB_USER", "DWH_DB_PASSWORD", "DWH_PORT", "DWH_IAM_ROLE_NAME"],
              "Value":
                  [DWH_CLUSTER_TYPE, DWH_NUM_NODES, DWH_NODE_TYPE, DWH_CLUSTER_IDENTIFIER,
                  DWH_DB, DWH_DB_USER, DWH_DB_PASSWORD, DWH_PORT, DWH_IAM_ROLE_NAME]
             })
Creating clients for IAM, EC2 and Redshift ressources
ec2 = boto3.resource('ec2',
                       region_name="us-east-2",
                       aws_access_key_id=KEY,
                       aws_secret_access_key=SECRET
                    )

iam = boto3.client('iam',aws_access_key_id=KEY,
                     aws_secret_access_key=SECRET,
                     region_name='us-east-2'
                  )

redshift = boto3.client('redshift',
                       region_name="us-east-2",
                       aws_access_key_id=KEY,
                       aws_secret_access_key=SECRET
                       )
Creating the IAM Role that makes Redshift able to access S3 buckets (ReadOnly)
try:
    print("Creating new IAM Role")
    dwhRole = iam.create_role(
        Path='/',
        RoleName=DWH_IAM_ROLE_NAME,
        Description = "Allows Redshift clusters to call AWS services on your behalf.",
        AssumeRolePolicyDocument=json.dumps(
            {'Statement': [{'Action': 'sts:AssumeRole',
               'Effect': 'Allow',
               'Principal': {'Service': 'redshift.amazonaws.com'}}],
             'Version': '2012-10-17'})
    )
except Exception as e:
    print(e)


print("Attaching Policy")

iam.attach_role_policy(RoleName=DWH_IAM_ROLE_NAME,
                       PolicyArn="arn:aws:iam::aws:policy/AmazonS3ReadOnlyAccess"
                      )['ResponseMetadata']['HTTPStatusCode']

print("Get the IAM role ARN")
roleArn = iam.get_role(RoleName=DWH_IAM_ROLE_NAME)['Role']['Arn']

print(roleArn)
Creating Redshift Cluster
try:
    response = redshift.create_cluster(

        ClusterType=DWH_CLUSTER_TYPE,
        NodeType=DWH_NODE_TYPE,
        NumberOfNodes=int(DWH_NUM_NODES),


        DBName=DWH_DB,
        ClusterIdentifier=DWH_CLUSTER_IDENTIFIER,
        MasterUsername=DWH_DB_USER,
        MasterUserPassword=DWH_DB_PASSWORD,


        IamRoles=[roleArn]
    )
except Exception as e:
    print(e)
Redshift Cluster Details (Run ths piece of code several times until status show Available)
def prettyRedshiftProps(props):
    pd.set_option('display.max_colwidth', -1)
    keysToShow = ["ClusterIdentifier", "NodeType", "ClusterStatus", "MasterUsername",
                  "DBName", "Endpoint", "NumberOfNodes", 'VpcId']
    x = [(k, v) for k,v in props.items() if k in keysToShow]
    return pd.DataFrame(data=x, columns=["Key", "Value"])

myClusterProps = redshift.describe_clusters(ClusterIdentifier=DWH_CLUSTER_IDENTIFIER)['Clusters'][0]
prettyRedshiftProps(myClusterProps)
Redshift Cluster endpoint and role ARN
DWH_ENDPOINT = myClusterProps['Endpoint']['Address']
DWH_ROLE_ARN = myClusterProps['IamRoles'][0]['IamRoleArn']
print("DWH_ENDPOINT :: ", DWH_ENDPOINT)
print("DWH_ROLE_ARN :: ", DWH_ROLE_ARN)
Incoming TCP port to access to the cluster endpoint
try:
    vpc = ec2.Vpc(id=myClusterProps['VpcId'])
    defaultSg = list(vpc.security_groups.all())[0]
    print(defaultSg)
    defaultSg.authorize_ingress(
        GroupName=defaultSg.group_name,
        CidrIp='0.0.0.0/0',
        IpProtocol='TCP',
        FromPort=int(DWH_PORT),
        ToPort=int(DWH_PORT)
    )
except Exception as e:
    print(e)
Checking the connection to the redshift cluster
conn_string="postgresql://{}:{}@{}:{}/{}".format(DWH_DB_USER, DWH_DB_PASSWORD, DWH_ENDPOINT, DWH_PORT,DWH_DB)
print(conn_string)

print('Connecting to RedShift', conn_string)
conn = psycopg2.connect(conn_string)
print('Connected to Redshift')
Cleaning and deleting all the resources (Do not run these lines until finish your experiments)
# redshift.delete_cluster( ClusterIdentifier=DWH_CLUSTER_IDENTIFIER,  SkipFinalClusterSnapshot=True)

# myClusterProps = redshift.describe_clusters(ClusterIdentifier=DWH_CLUSTER_IDENTIFIER)['Clusters'][0]
# prettyRedshiftProps(myClusterProps)

# iam.detach_role_policy(RoleName=DWH_IAM_ROLE_NAME, PolicyArn="arn:aws:iam::aws:policy/AmazonS3ReadOnlyAccess")
# iam.delete_role(RoleName=DWH_IAM_ROLE_NAME)
Building an ETL data pipeline with Apache Airflow
This project requires that you have prior knowledge of these technologies, however my YouTube video could help you in case you do not have experience with the tools, in this way you can mount the project without the need of previous experience. I will not delve into explaining what Apache Airflow is, this section will focus on explaining the process of data integration of the UBER receipts until reaching a common data source, the final data source is the data model that was designed in the previous section.
Docker environment
Amazon AWS has an answer to the need of data engineers who love Apache Airflow in the cloud, here you can read more about it: Introducing Amazon Managed Workflows for Apache Airflow (MWAA), However this project uses a Docker container, follow the steps below in order to accelerate the deployment of this project using docker:
-
Install Docker Desktop on Windows, it will install docker compose as well, docker compose will alow you to run multiple containers applications, Apache airflow has three main components: metadata database, scheduler and webserver, in this case we will use a celery executor too.
-
Once all the files needed were downloaded from the repository , Let’s run everything we will use the git bash tool again, go to the folder Uber-expenses-tracking we will run docker compose command
ramse@DESKTOP-K6K6E5A MINGW64 /c
$ cd Uber-expenses-tracking

ramse@DESKTOP-K6K6E5A MINGW64 /c/Uber-expenses-tracking
$ cd code
ramse@DESKTOP-K6K6E5A MINGW64 /c/Uber-expenses-tracking/code
$ echo -e "AIRFLOW_UID=$(id -u)\nAIRFLOW_GID=0" > .env
ramse@DESKTOP-K6K6E5A MINGW64 /c/Uber-expenses-tracking/code
$ docker-compose up airflow-init
$ docker-compose up
Ready!!!!, everything is up and running, the next thing to do is go to your browser and search http://localhost:8080 this will call your webserver and would open your AIRFLOW GUI, for this example the user and password is "airflow", you can change it in your .yaml file.
There is a couple of thing to configure to ensure the successful execution of your DAG:
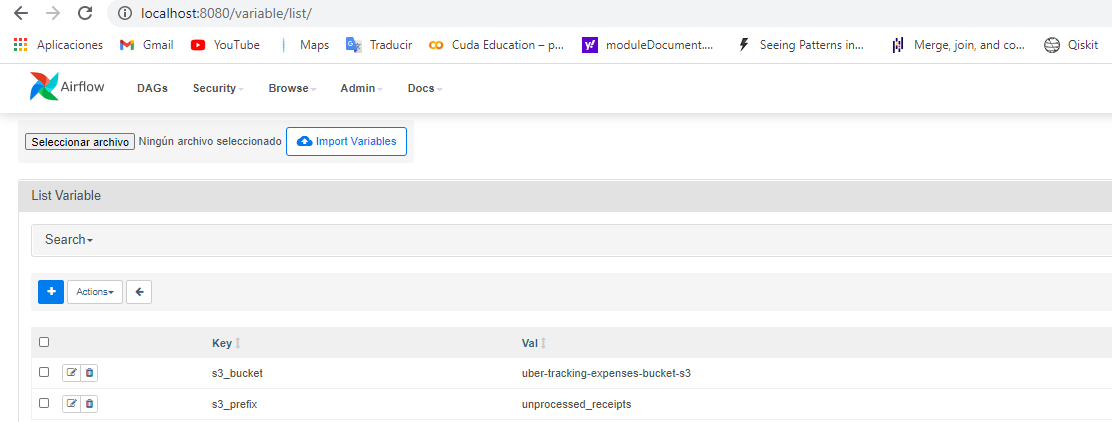
- Once inside your AIRFLOW GUI, In the header menu -> Admin -> Variables, Import the variables needed, they are located into the variables folder in the repository downloaded, import the variables.json file
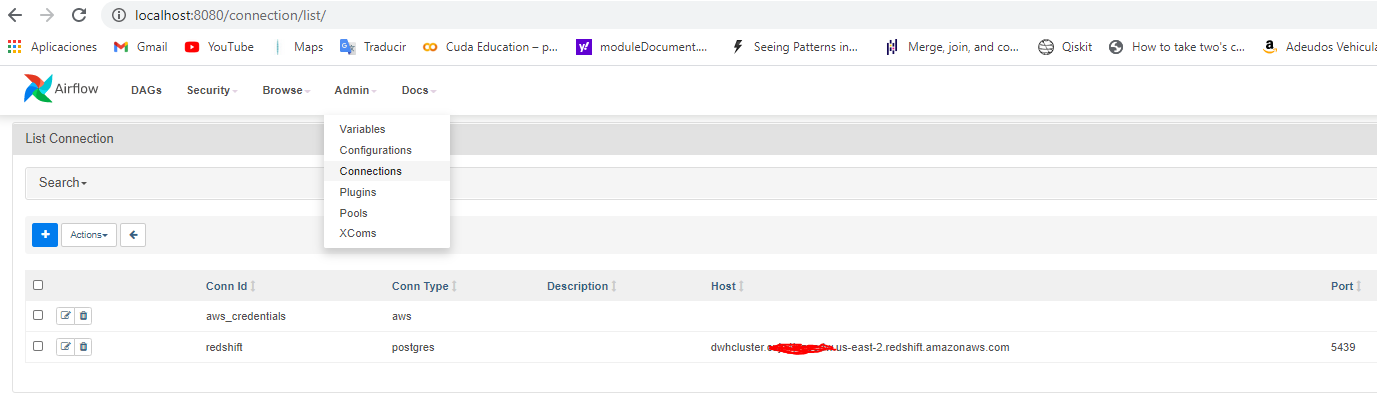
- Now go to Admin -> Connections and put the Connections needed, you AWS credentials and Your Redshift credentials
Running DAG
- Open a new git-bash console and put the below command, it will show you a list of containers with their ids
$ docker ps
- The scheduler are putting the dags for running, so, choose the container id related with the scheduler and execute the command below, it will execute the dags
$ docker exec 514e3077fafa airflow dags trigger Uber_tracking_expenses
- The other way for execute dags is using the GUI, which is easier to understand and manage
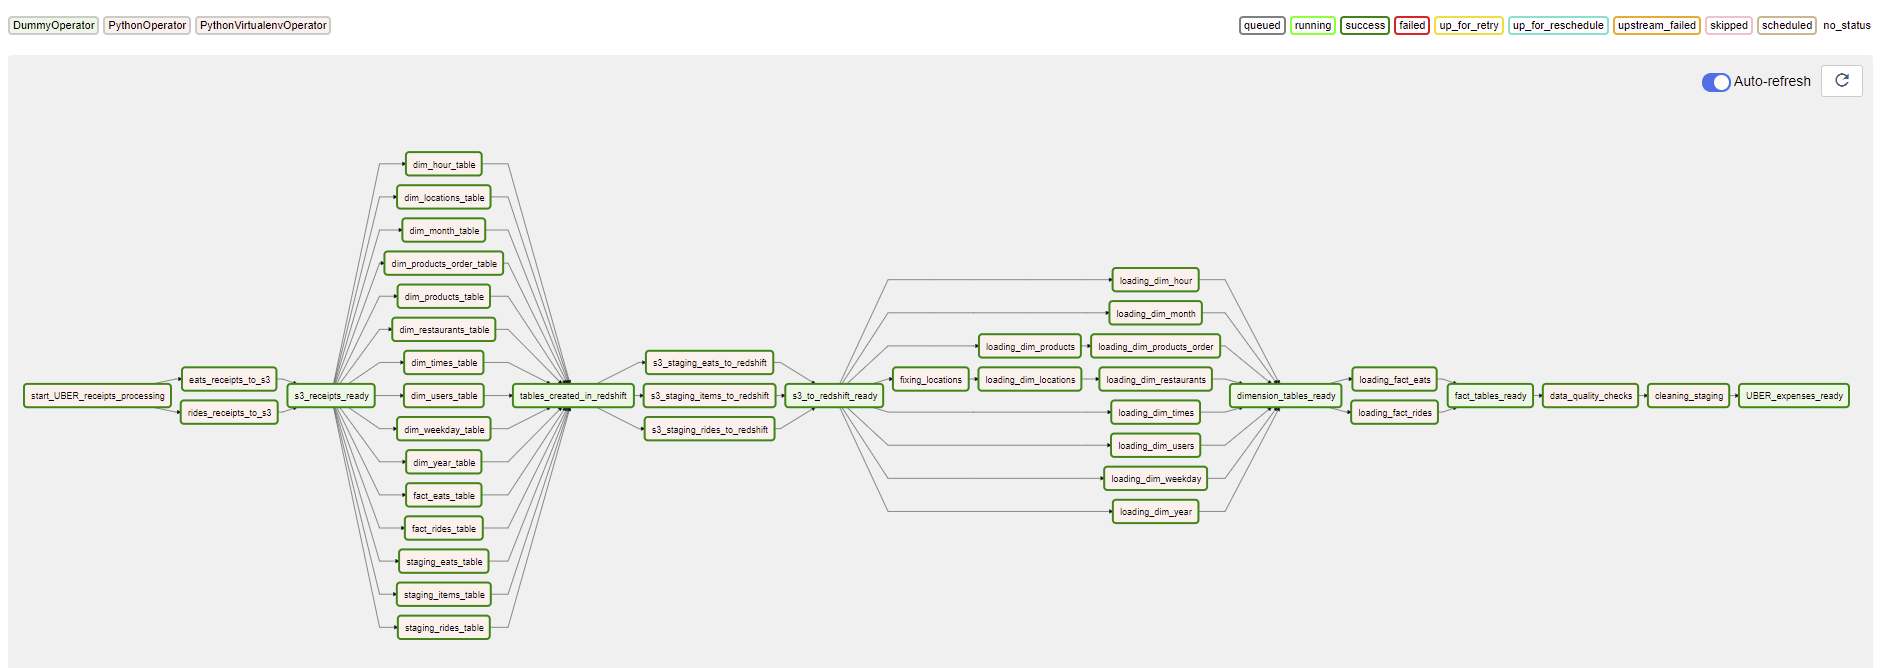
DAG Details
The DAG is made up of several important tasks, but I will only explain a brief summary of what it does:
At the beginning, the task called Start_UBER_Business is separating the Uber Eats receipts from the Uber rides receipts found in the S3 bucket uber-tracking-expenses-bucket-s3 in the folder unprocessed_receipts, both groups of receipts will be processed in parallel by the tasks rides_receipts_to_s3_task and eats_receipts_to_s3_task
-
The goal of these two tasks rides_receipts_to_s3_task and eats_receipts_to_s3_task that are running in parallel, is to condense in a single file all processed receipts of each kind eats and rides, the final datasets will be placed in the bucket airflow-runs-receipts, under the /rides and /eats folders as the case may be, the files are:
eats_receipts.csv: contains the information of all the receipts found for UBER Eats.
items_eats_receipts.csv: contains information of all the products involved in the purchase.
rides_receipts.csv: contains information on all receipts found for UBER Eats.
Once the two previous processes are finished, the tasks related to create the necessary objects in redshift are executed, dimension tables, fact tables and staging tables.
Once the tables were created in Redshift, Now the staging tables will be filled. The COPY command is useful for move the .csv files from the S3 bucket to Redshift, there are several benefits of staging data: Merging Data Using Staging Tables
staging_rides
staging_eats
staging_eats_items
-
Once all the staging tables were created and filled, now the dimension tables will be filled, as you can see in the file sql_statements.py all the necessary dimensions and fact tables for the DWH depend on the information contained in the staging tables. To maintain the consistency of the data, we are filling the dimensions first and then the fact tables, there would be no problem using other way around, because redshift does not validate the foreign keys, this is because redshift is a database which focuses on handling large volumes of data for analytical queries.
Once the filling of all the DWH tables is finished, we proceed to validate if there are records in them, it is a good practice to maintain a data quality check section in your ETL process for data integration. In the end, I deleted the staging tables because they are no longer needed.
Below is the final DAG for this project:
Visualizing AWS Redshift data using Microsoft Power BI
Now, you will connect Power BI Desktop to AWS Redshift data, create a dashborad for Uber Eats and Uber Rides, publish the report to Power BI service, and you can consume the report from your mobile device as well.
- Launch Power BI Desktop
- Sign in to the Service with your Power BI credentials
- Select Home -> Get Data -> More > Database -> Amazon Redshift
- Click Connect
- On the next screen, provide the following values: Server, Database and Data Connectivity Mode (Import)
- Build your dashboards, in this case there are already two dashboards with several reports on it and you can use the same example below on the file report_receipts.pbix
- Update your redshift cluster, it will change

- After you create the dashboards in Power BI Desktop, you will need to publish the dataset and dashboards to Power BI to share it with others or consume it from a mobile device.
- In Power BI Desktop, choose Publish
- Choose My workspace.
- Choose Select.
Contributing and Feedback
Any ideas or feedback about this repository?. Help me to improve it.
Authors
- Created by Ramses Alexander Coraspe Valdez
- Created on 2021
License
This project is licensed under the terms of the Apache License.