Building a Big Data Pipeline with PySpark and Amazon EMR on EC2 Spot Fleets and On-Demand Instances
If you are a data scientist and you are ready to take the next step in your career and become an applied scientist you must leave behind school projects that involve working with small datasets, the true nature of an applied scientist is knowing how to take advantage of computing on a massive scale, and the resources available to analyze large datasets in a cost-effective way, you must begin to know the technologies available to work and process large datasets and this is where data engineering skills begin to be relevant to take the next step in your career, also, this new change involves more responsibilities such as:
- Choose a provider for cloud computing
- Create scalable and cost-effective architectures
- A strategy to monitor your expenses and resources
- Tuning
- Be updated in technologies that allow you to do cloud computing in a profitable way.
The goal of this project is to offer an AWS EMR template that you can use quickly if the need for your analysis involves working with millions of records, the template can be easily altered to support the size of your project and in this way you will not worry about creating everything from the begining and just focus on writing pyspark code.
Architecture - Automate Word Cloud
Data sources
In order to reproduce the effect of working with a large dataset we are using the Amazon Customer Reviews Dataset, counting the different words that have the titles of the purchased books and creating word clouds for each year. This project does not focus on specific analysis, its objective is to create a big data pipeline and connect its different tasks involved using an AWS EMR cluster. You could use this same template for other types of projects or analysis.
Infrastructure as Code (IaC) in AWS
This project is managing everything using boto3 IAC, the only thing in which you need to be focus is in write your PySpark code tasks or steps and write the logic of communication between these steps or tasks using the file steps.json. At the end, all these things will be your big data pipeline.
File structure
IAC files
Since the entire infrastructure is created by code, there are several files that were modified to create this project, you can get the original source in the amazon documentation Python Code Samples for Amazon EMR , the modified files of this project are:
- ec2.py: this file helps us create the security groups in our VPC.
- iam.py: this file is for create the two associated roles: AmazonElasticMapReduceRole and AmazonElasticMapReduceforEC2Role.
- s3.py: Control and manage the initial configuration that our S3 bucket needs, scripts, logs, configuration files, etc..
- poller.py: this is checking a function for status each N seconds until reach a specified status.
- emr.py: this file contains the functions to create an emr cluster and add steps to the cluster using boto3.
Main process
-
emr_process.py: this file is wrapping the basic functions of the boto3 library, the difference is that it is modified to interpret and understand our configuration files or project template.
- create_cluster
- add_steps
- execute_steps

Configuration files
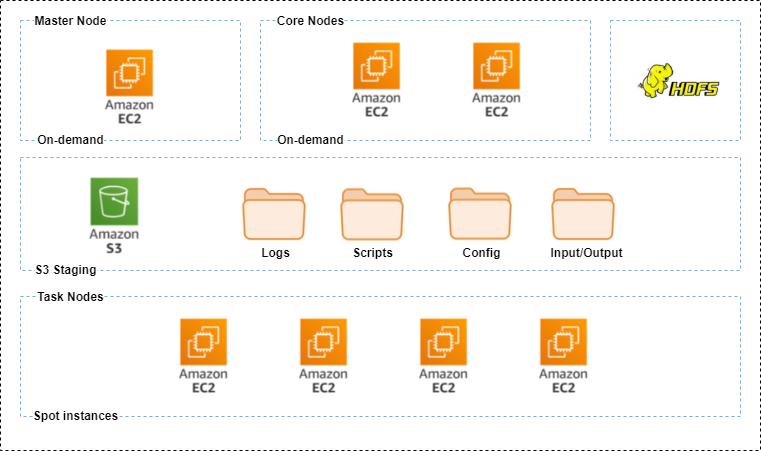
- cluster-ec2-spot-fleet.json: this file contains everything related to the fleet of ec2 spot and on-demand instances, it contains special configuration for spark and yarn, the property yarn.nodemanager.resource.memory-mb is the amount of physical memory, in MB, that is reserved for non-YARN processes, was configured following the below rule:
executor memory + memory overhead < yarn.nodemanager.resource.memory-mb
{
    "InstanceFleets": [
        {
            "Name": "fleetmaster",
            "InstanceFleetType": "MASTER",
            "TargetOnDemandCapacity": 1,
            "InstanceTypeConfigs": [
                {"InstanceType":"m5.xlarge"}
            ]
        },
        {
            "Name": "fleetcore",
            "InstanceFleetType": "CORE",
            "TargetOnDemandCapacity": 8,
            "TargetSpotCapacity": 0,
            "InstanceTypeConfigs": [
                {"WeightedCapacity":8,"BidPriceAsPercentageOfOnDemandPrice":100,"InstanceType":"m5.2xlarge"},
                {"WeightedCapacity":8, "BidPriceAsPercentageOfOnDemandPrice":100,"InstanceType":"m4.2xlarge"}
            ]
        },
        {
            "Name": "fleettask",
            "InstanceFleetType": "TASK",
            "TargetOnDemandCapacity":0,
            "TargetSpotCapacity": 80,
            "InstanceTypeConfigs": [

                    {"WeightedCapacity":8,
                     "BidPriceAsPercentageOfOnDemandPrice":100,
                     "InstanceType":"m5.2xlarge"
                    },
                    {"WeightedCapacity":8,
                     "BidPriceAsPercentageOfOnDemandPrice":100,
                     "InstanceType":"m4.2xlarge"
                    },
                    {"WeightedCapacity":8,
                     "BidPriceAsPercentageOfOnDemandPrice":100,
                     "InstanceType":"m5a.2xlarge"
                    },
                    {"WeightedCapacity":8,
                     "BidPriceAsPercentageOfOnDemandPrice":100,
                     "InstanceType":"m6g.2xlarge"
                    },
                    {"WeightedCapacity":8,
                     "BidPriceAsPercentageOfOnDemandPrice":100,
                     "InstanceType":"r5.2xlarge"
                    }
            ],
            "LaunchSpecifications": {
                "SpotSpecification": {
                    "TimeoutDurationMinutes": 60,
                    "BlockDurationMinutes":60,
                    "TimeoutAction": "TERMINATE_CLUSTER"
                }
            }
        }
    ],
    "bootstrap_action": "bootstrap-action.sh",
    "Configurations": [{
                    "Classification": "spark-env",
                    "Properties":{},
                    "Configurations": [{
                    "Classification": "export",
                    "Properties": {
                        "PYSPARK_PYTHON": "/usr/bin/python3"
                    }
                    }]
                },
                {
                    "Classification": "spark-defaults",
                    "Properties": {
                        "spark.yarn.stagingDir": "hdfs:///tmp",
                        "spark.yarn.preserve.staging.files": "true",
                        "spark.kryoserializer.buffer.max": "2000M",
                        "spark.serializer": "org.apache.spark.serializer.KryoSerializer",
                        "spark.driver.maxResultSize": "0",
                        "spark.jars.packages": "com.johnsnowlabs.nlp:spark-nlp_2.12:3.1.0"
                    }
                },
                  {
                    "Classification": "spark",
                    "Properties": {
                      "maximizeResourceAllocation": "false"
                    }
                  },
                  {
                    "Classification": "mapred-site",
                    "Properties": {
                      "mapred.job.jvm.num.tasks": "-1"
                    }
                  },
                  {
                    "Classification": "yarn-site",
                       "Properties": {
                           "yarn.nodemanager.resource.memory-mb":"22888"
                       }
                     }
                ],
    "Ec2SubnetIds": [ "subnet-f384febf", "subnet-9cc763f7", "subnet-440e1c3e" ],
    "KeepJobFlowAliveWhenNoSteps": true
}
-
bootstrap-action.sh: the first step of the pipeline will use sparknlp , the lines recomended by them were added to the bootstrap file plus other needed packages
-
steps.json: this file contains all the logic to communicate the output of a step with the input of another step, if you want to modify this template for another type of project then all your steps must be explained in this file and the logic of how they communicate must to be here.
If the property input_dependency_from_output_step is 1, then the output of the previous step will be the input of the current step
{
"steps":
[
{
"executor_memory": "18G",
"executor_cores": "4",
"description" : "Reading from dataset data and filtering",
"name": "step_0",
"guiid": "0",
"ActionOnFailure": "CANCEL_AND_WAIT",
"script_uri":"pyspark/pyspark_preprocessing_text.py",
"script_args":
{
"auto_generate_output": "1",
"output_uri": "None",
"format_output": ".parquet",
"external_input": "1",
"input_dependency_from_output_step": "0",
"from_step": "None",
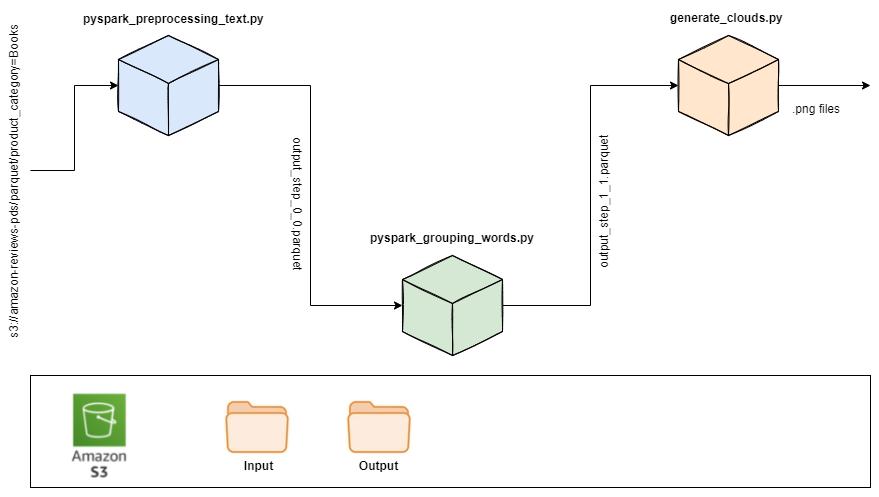
"input_data": "s3://amazon-reviews-pds/parquet/product_category=Books",
"local_input": ""
}
},
{
"executor_memory": "18G",
"executor_cores": "4",
"description" : "Gnerating final dataset",
"name": "step_1",
"guiid": "1",
"ActionOnFailure": "CANCEL_AND_WAIT",
"script_uri":"pyspark/pyspark_grouping_words.py",
"script_args":
{
"auto_generate_output": "1",
"output_uri": "None",
"format_output": ".parquet",
"external_input": "0",
"input_dependency_from_output_step": "1",
"from_step": "step_0",
"input_data": "None",
"local_input": ""
}
},
{
"executor_memory": "18G",
"executor_cores": "4",
"description" : "generating clouds",
"name": "step_2",
"guiid": "2",
"ActionOnFailure": "CANCEL_AND_WAIT",
"script_uri":"pyspark/generate_clouds.py",
"script_args":
{
"auto_generate_output": "1",
"output_uri": "None",
"format_output": ".png",
"external_input": "0",
"input_dependency_from_output_step": "1",
"from_step": "step_1",
"input_data": "None",
"local_input": "data/usa.png"
}
}
]
}
PySpark code
- pyspark_preprocessing_text.py: this code is using spark nlp to preprocess the text included in the titles of books purchased on Amazon, extract the relevant words from the title of each book purchased and create another column called exploded_text.
- pyspark_grouping_words.py: this code is grouping by year all the words found in the title of books, its output is a dataset with all the words by year, it will be the input of the next step.
- generate_clouds.py: this file is receiving as a input the output of the last step and is generating word clouds by year and putting each word cloud image in the S3 bucket of the project.
Running the example
If you do not want to read the steps below you can see this Youtube video where it explains how to run the example step by step.
Steps to follow:
- Create a new User in AWS with *AdministratorAccess** and get your security credentials
- Go to this url: AWS CLI and configure your AWS Credentials in your local machine
- Install git-bash for windows, once installed , open git bash and download this repository, this will download all the files needed.
ramse@DESKTOP-K6K6E5A MINGW64 /c
$ git clone https://github.com/Wittline/pyspark-on-aws-emr.git
Now, Let’s create a new AWS EMR cluster with the name: wittline
ramse@DESKTOP-K6K6E5A MINGW64 /c/pyspark-on-aws-emr/code
python emr_process.py -a create_cluster -c wittline
The above step will throw a new cluster id, this time was: “j-39DQEKGDZO6C0”, the next step will upload the steps involved of the current cluster job to our S3 bucket of the project.
ramse@DESKTOP-K6K6E5A MINGW64 /c/pyspark-on-aws-emr/code
python emr_process.py -a add_steps -steps steps.json -idc j-39DQEKGDZO6C0
Once the steps were uploaded, now you can execute the steps, this action will read the steps from the S3 bucket of the project and will throw them to the job in the correct order.
ramse@DESKTOP-K6K6E5A MINGW64 /c/pyspark-on-aws-emr/code
python emr_process.py -a execute_steps -idc j-39DQEKGDZO6C0
Once the execution of the three steps were completed, you can download the word clouds generated using the following command:
The name of the S3 bucket created on this case is: wittline-1624387595519505700
aws s3 sync s3://wittline-1624387595519505700/output/ c:/word_clouds --exclude "output_step_0_0.parquet/*" --exclude "output_step_1_1.parquet/*"
Remember to terminate your cluster and choose Yes to delete all resources created
ramse@DESKTOP-K6K6E5A MINGW64 /c/pyspark-on-aws-emr/code
python emr_process.py -a terminate_cluster -idc j-39DQEKGDZO6C0
Evolution of the word clouds from the titles of books purchased on Amazon USA (1995 - 2015)

Contributing and Feedback
Any ideas or feedback about this repository? or do you need help to deploy it?
| Contact me on | Medium |
Authors
- Created by Ramses Alexander Coraspe Valdez
- Created on June 2021
License
This project is licensed under the terms of the Apache License.